Online Request Options Window
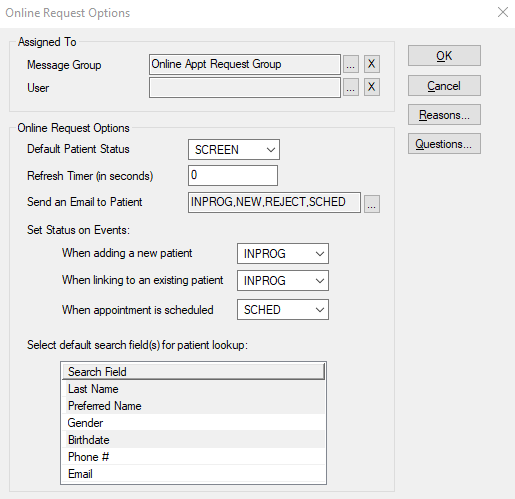
The Online Request Options window allows you to configure settings and options for the Patient Appointment Request functionality of PatientAccess.
 Online Request Options - Field Definitions Online Request Options - Field Definitions
| Message Group / User
|
Fields used to indicate the Message Group or User that online requests are assigned to by default.
Click the ellipsis to display the Message Groups or Users List window.
Click the X button to clear the field.
Important: If a user and message group are both specified, the requests will be assigned to the user only. We recommend you specify either a user or group to avoid confusion.
|
| Default Patient Status
|
A drop-down list that the default Patient status to use when a patient is created from an online request.
This drop-down list displays active patient status codes specified in Status Codes.
|
| Refresh Timer (in seconds)
|
A field that indicates the amount of time before axiUm refreshes the Online Request tab of the Personal Planner module. |
| Send an Email to Patient
|
A field that indicates the request status codes that automatically send an email to the patient when the request is set to the status.
Click the ellipsis to display the Select Status Codes window and specify the status codes that trigger an email to the patient and the templates to use to for those emails.
|
| <Set Status on Events> When adding a new patient
|
A drop-down list that the default Online Request status code to use when a patient is created from an online request.
This drop-down list displays active Online Request status codes specified in Status Codes.
|
| <Set Status on Events> When linking to an existing patient
|
A drop-down list that the default Online Request status to use when a patient is created from an online request.
This drop-down list displays active Online Request status codes specified in Status Codes.
|
| <Set Status on Events> When appointment is scheduled
|
A drop-down list that the default Online Request status to use when a patient is created from an online request.
This drop-down list displays active Online Request status codes specified in Status Codes.
|
| Select default search field(s) for patient lookup
|
Fields that identify the search criteria fields used (selected) by default when performing a patient chart lookup from an online request.
|
| Reasons…
|
A button used to display the Online Request Reasons window to specify the list of possible appointment reasons. |
| Questions…
|
A button used to display the Custom Questions window used to configure custom questions to display on the online request. |
Online Request Options - Tasks
| Configure Online Request Options
|
- Complete / modify the fields as necessary and click OK.
|
| Specify Online Request Reasons
|
- Click the Reasons.... button to display the Online Request Reasons window.
- Configure the list of reasons to display in the appointment request.
|
| Specify Custom Questions
|
- Click the Questions.... button to display the Online Request Questions window.
- Configure the list of questions (and answers, if applicable) to display in the appointment request.
|
Select Status Codes Window
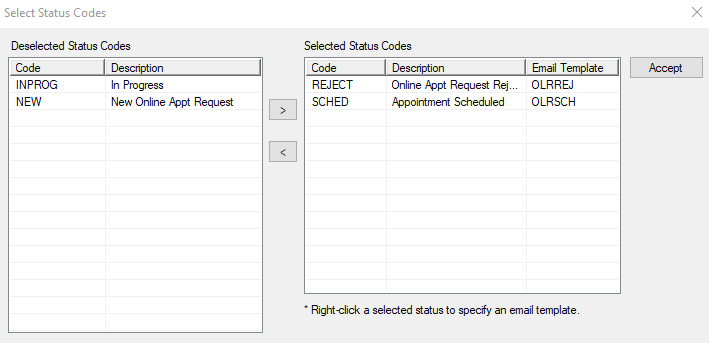
Online request status codes are used to indicate the progression through an online request.
The Select Status Codes window allows you to specify any Online Request status codes that should trigger an email to the patient.
Example: Automatically send an email to the patient when their appointment has been scheduled.
Select Status Codes - Tasks
| Select Status Codes to Send Emails
|
- Select a status code from the Deselected Status Codes list.
- Click the > button to move the code to the Selected Status Codes list.
|
| Specify Templates for Status Code Emails
|
- Right-click on an entry from the Selected Status Codes list and choose Select Email Template to display the Email Templates (for Online Requests) window.
- Select the correct email template for this situation and close the window.
|
| Remove Status Codes from Sending Emails
|
- Select a status code from the Selected Status Codes list.
- Click the < button to move the code to the Deselected Status Codes list.
|
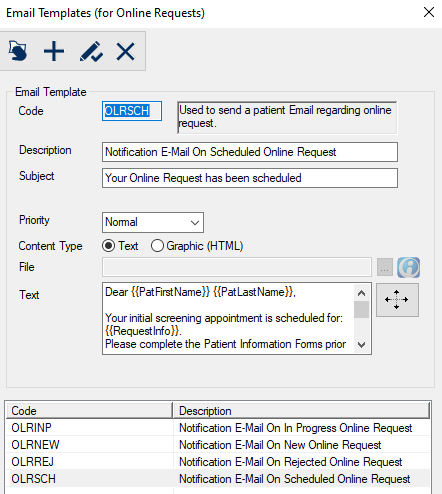
Email Template (for Online Requests) Window
The Email Template (for Online Requests) window allows you to select and manage the template to use for the email sent when a request is assigned the selected status.
Email Template (for Online Requests) - Field Definitions
| Code
|
The code and summary of the selected template.
|
| Description
|
A text field that describes the selected template. |
| Subject
|
A text field that indicates the subject line to use when the subject line from the original message is not used. |
| Priority
|
A drop-down list that indicates the priority of the email notification:
|
| Content Type
|
A set of radio buttons that indicates the format of the email notification:
|
| File
|
A text field that indicates the .html file to use for the email message.
The ellipsis is used to navigate to the file.
Note: This field is enabled if Content Type is set to Graphic (HTML).
|
| Text
|
A text field that indicates the content of the email notification.
Note: This field is enabled if Content Type is set to Text.
|
Email Template (for Online Requests) - Tasks
| Select Template
|
- Double-click the template to select it and close the window.
|
| Add Templates
|
- Click the Clear Data (
 ) icon. ) icon.
- Complete the fields as necessary and click the Add a new Record (
 ) icon. ) icon.
|
| Edit Templates
|
- Select a listed entry.
- Make any necessary changes and click the Modify Record (
 ) icon. ) icon.
|
| Delete Templates
|
- Select a listed entry and click the Delete Record (
 ) icon. ) icon.
- When prompted, click Yes to confirm the deletion.
|
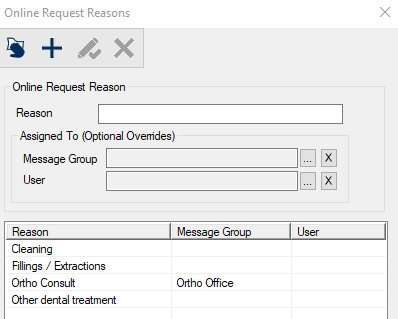
Online Request Reasons Window
The Online Request Reasons window allows you to manage the list of possible appointment reasons that displays as a drop-down list on the online request form and allows patients to select a reason for their request
Online Request Reasons - Field Definitions
| Reason
|
A text field that indicates the code that identifies the certification.
|
| Message Group / User
|
Fields used to indicate a different Message Group or User that online requests are assigned to when this reason is selected.
Click the ellipsis to display the Message Groups or Users List window.
Click the X button to clear the field.
Important: If a user and message group are both specified, the requests will be assigned to the user only. We recommend you specify either a user or group to avoid confusion.
|
Online Request Reasons - Tasks
| Add Online Request Reasons
|
- Click the Clear Data () icon.
- Complete the fields as necessary and click the Add a new Record () icon.
|
| Edit Online Request Reasons
|
- Select a listed entry.
- Make any necessary changes and click the Modify Record () icon.
|
| Delete Online Request Reasons
|
- Select a listed entry and click the Delete Record () icon.
- When prompted, click Yes to confirm the deletion.
|
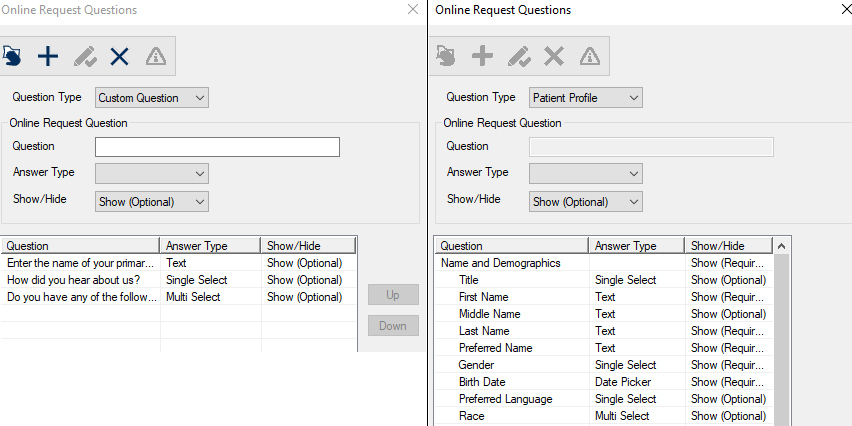
Online Request Questions Window
The online request page includes several patient demographic questions to ensure that the most important information is captured on the request form.
You can control whether additional demographic information such as address and race and ethnicity questions display, and whether or not they are required and must be answered in order to submit the request.
For any other information, you can create custom questions that display on the online request form, and specify whether they are required or optional to answer.
Tip: To keep the form short and efficient for patients, limit your list of questions to the most important for your institution. Other information can be collected later in the workflow.
The Online Request Questions window allows you to manage the list of questions to include on the online request.
The Question Type drop-down list allows you to configure the two types of online request questions:
-
Custom Questions
-
Patient Profile
Online Request Questions - Field Definitions
| Question Type
|
A drop-down list that indicates the type of questions to display:
- Custom Question
- Patient Profile
|
| Question
|
A text field that indicates the question that will display to the patient on the online request page.
|
| Answer Type
|
A drop-down list that indicates the type of answer:
- Multi Select
- Single Select
- Text
- Date Picker
- Email
- Phone
- checkbox
- Long Text
- Yes/No Buttons
|
| Show/Hide
|
A drop-down list that indicates if the question is required:
Note: If the drop-down list is disabled, the entry is set to Show (Required) and is not configurable.
|
| Allow custom input
|
A checkbox that, when selected, indicates that patients can enter a non-listed value as an answer. |
Online Request Question List Item Window
You must create answers for any questions that are defined as Single Select or Multi Select.
The Online Request Question List Item window allows you to manage the list possible answers for the selected question.
|